A Freelancer's guide to preparing a professional photo shoot

As freelancers, we have to be know how to sell our skills and personality. Most of us have a website or an about.me page where we explain briefly who we are and what we do for our clients. We have social media profiles on every platform, all promoting our personal brand in a way or another.
But there comes a time in your freelancing career, where selfies at the beach or cropped group photos don’t represent your personal brand enough anymore. A time where you might want to be more public about your work, speak at a conference, write an ebook or start a course.
In short, a time where your face will appear more often on the internet, and you might want some professional shots of yourself instead of your old portraits from the university.
I recently did my first professional photoshoot for work, and wanted to share the whole process I went through.
8 steps guide to a freelancer's professional photoshoot
1. Why do you need a professional photoshoot?
As with any project, you should first define why exactly you are doing it. For me, I wrote down where I wanted to take my freelancing career and what goals I had for the next 2-3 years.
In a nutshell, I want to speak at conferences, take on long-term projects that really appeal to me and stick to my values, and share my knowledge by creating a few online courses. As you can see, some goals will require some pictures of myself for communication purposes.
In the case of conferences, it’s likely the communication won’t be done by me, so I won’t have much control over what image of me is being shared around the internet. I figured I might as well have a quality media kit to give away instead of having teams scrape pixelized versions of my old profile pictures.
I also believe that the key element of differentiation between 2 freelances with equal skills is their personalities, and what better way to show your personality than with a personal website with high-quality pictures of yourself?
Okay, now you know why you want to spend a couple of awkward hours with a huge lens pointing at you, let’s get move on to my next point: money.
2. Define your budget
Your freelance activity is a business, and you are going to invest in your communication. As with any business project, you should be budgeting your photoshoot wisely, as prices for photographers can vary a lot.
From my experience, I knew I wanted to use those pictures for 2 to 3 years. That’s how old my previous portraits are, that were kindly taken by a colleague in a coffee shop near our workplace. Given my current communication expenses - mainly consisting of this website, costing around 50 euros per year, and given my current earnings, I knew I could spend up to 200 euros comfortably for a photoshoot.
Now, that might seem a lot to you, or really not enough. As I said, prices vary a lot for photoshoots. You can easily have a beautiful set of portraits done by a skilled friend with a smartphone in a park, or head to a famous photo studio in Paris. I suggest looking a how much you can afford first, and then find a photographer in your budget.
3. Create a mood board
If I tell you to think of a nice portrait of yourself, you probably already have a very precise idea in your mind. Perhaps it’s a combination of photos, locations, and people you like.
What clothes are you wearing? Are you standing or sitting? Are you working? Do you have something in your hands? Are you eating or drinking something? Are you at a big or small table? Are you inside or outside? Are you smiling, laughing, or being serious? Are you alone or are there other people? Are you at home or in a public area? What colours do you see?
These are elements your photographer will need to know to make sure he or she gives you the result you expect, and it might be complicated to express in an email the idea you have in mind. That’s why you should create a mood board.
If you are not familiar with the concept, a mood board is essentially a collection of pictures, illustrations and colour palettes that reflect the ambience, the vibe of the result you want to achieve.
At first, I gathered pictures that resembled the result I was aiming for on Pinterest. I found it was the quickest way for me to build an easily shareable image collection, but you can use whatever tool suits you best. What I liked also about Pinterest is that they will suggest images related to the ones you already set up in your board, and you can add your own ones you found elsewhere on the internet also.
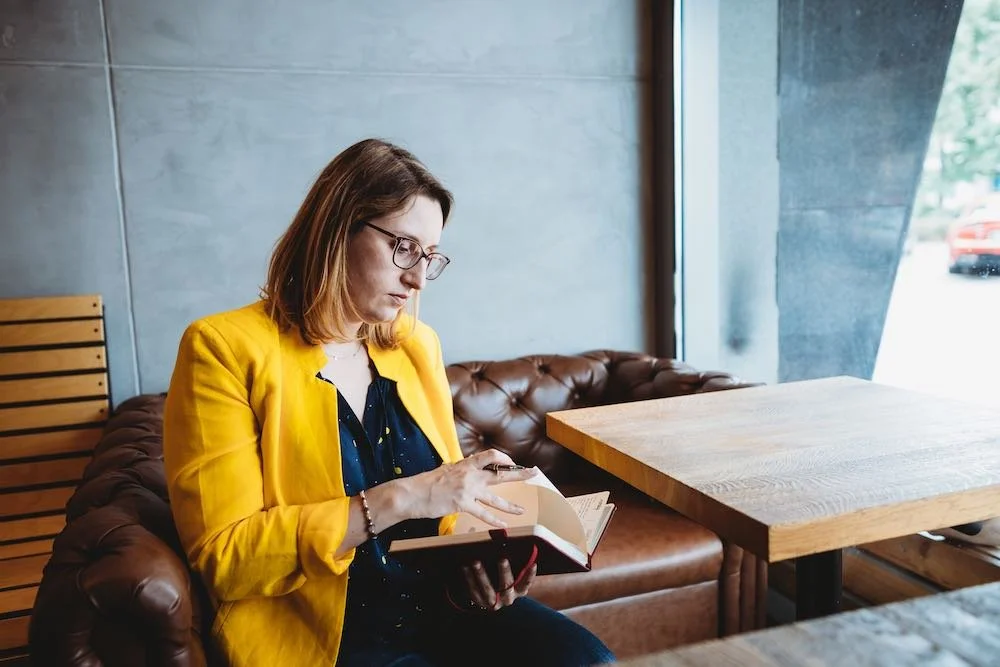
For extra clarity on my expectations, I split my board into two parts: Poses and Locations. I knew exactly what kind of attitude I wanted to show and the type of environment I wanted to be in. A lot of my inspiration came from Emma Gannon's main photo on her website, where she seems to be in a cosy bar with a bright yellow jacket. I really loved the idea of a cosy place with a bright colour popping out. I am also very productive and happy in hipster coffee shops, so that's the kind of place I wanted people to see me in.
With that in hand, your photographer should be able to understand your vision.
4. Find a photographer
I travel a lot and change home every couple of months, so I knew I couldn't ask around for a photographer, I had to find one from scratch. The good news is we have the internet and finding someone to take pictures of you is not very complicated if you have Google and Instagram.
While you are searching for the perfect photographer, keep in mind the style of pictures you want. You can't expect good indoor portraits from someone specialized in nature photography. Have a look at their previous projects and their style, and choose someone you resonate with on an artistic level.
I started by searching by location, in this case, Vilnius, Lithuania. I mainly looked for fashion-related posts as I knew I needed a photographer used to working one-on-one with women. Sometimes the posts were made by the photographer him or herself, sometimes by the model, who usually tags the photographer somewhere in the caption. If the people I found had a website or portfolio, I would also check them out.
I contacted a few directly by DM, explaining clearly what I was searching for.
I actually found my photographer on Facebook, despite the fact we both rarely spend any time of this platform. It turns out Facebook search works quite well and I was able to find at least two interesting photographers there. Since their pages are often linked to their Instagram profiles, it was easy for me to check out their work, websites and contact them through Messenger.
Upwork
I never had the opportunity to be the one hiring for a job, so I tried posting a job on Upwork for this project. I found a few interesting people, mainly art students searching for side gigs. Even if the people I found there were interesting, I didn't move forward with them and found the process of posting a job quite tedious.
Google?
I'm really not sure Google is the right place to find a photographer. It will depend a lot on your location and you can't be sure high-ranked photographers will be the best fit for you. In any case, a quick search is always useful so you might as well give it a go.
What should you ask them?
Here is the message I sent to photographers I was interested in:
Hi,
I am a digital marketing freelancer and I travel full-time around Europe. I am spending the summer in Vilnius and I am searching for someone to take photos of me for my professional website. Would you be interested by this kind of project? Alizée
Who was my photographer?
I ended up working with a talented young photographer from Vilnius, Lithuania: Elvinas Dalala. We met for a first contact a couple of weeks before the shoot and he was very attentive to what I wanted from the photo shoot. During the photo session, he was super professional and kind, helping me relax and look my best. If you are searching for a photographer in Vilnius or a photographer in Switzerland (he travels often there), I couldn't recommend Elvinas more!
5. Find locations
When you established your mood board, you probably already had a few locations in mind. In my case, I knew I wanted to be in "my natural environment", somewhere I feel at ease and where I like working.
For me, that meant no parks, beaches, office spaces, no super cliché digital nomad places you see in news articles. By the way, do people still believe you can work with your expensive laptop from a beach?! Not to mention the sun reflection in the screen, the lack of wifi and the dangerous sand that can ruin your machine...
I love working from home, but also from coffee shops. I find I am much more productive with a good coffee and the surrounding buzz of a good coffee place, so that's where I wanted to be photographed.
I started looking for locations right after my first meeting with the photographer. I googled coffee shops around me, checked out their photos and, if the place wasn't too far away, took a walk there. I met with one owner in person, to whom I asked what was their less busy moment in the week and if they would accept a small 2-hour photoshoot in their establishment. The response was positive.
In the following days, I made a list on Google Maps of places I liked, sorted them by preference and contacted them by phone or on their Facebook page one after the other.
Here is the message I sent to coffee places I was interested in:
Hi, I'm a French freelancer in Vilnius for a few months, and I'd like to come next Tuesday morning to take some professional photos for my website. It would be just myself and a photographer. Would you agree for us to come a take a few shots?
Side note: Tuesdays are usually the less busy day of the week for local businesses, and mornings between 10 am and 12 pm are also quite calm for coffee shops.
I would suggest adding the following information in your message:
Name
Activity
Why you want to have pictures taken, what is the nature of the photoshoot
Where these pictures will go
When you want to come over
How long it will last
How many people will there be
Also, always double-check with the person in charge once you arrive at the location. In my case, we always had a quick chat with the barista to make sure we weren't causing any trouble, and of course, we always ordered coffee for both the photographer and I. A good latte art makes a great prop too!
6. gather your props
Having a few familiar objects to play around with and give dimension to your shots is a great idea. You will feel more at ease surrounded by "your stuff" and it will give the photographer some ideas to work with.
Here is the complete list of the props I took with me:
Blue Moleskine notebook
Red notebook
Beige notebook (I really like notebooks)
MacBook Pro 15" because that's what I work with, I have a case on it for extra safety at airports security that I took off obviously
Black Magic Mouse 2
A nice coaster I have and use every day for my coffee mug
A leather pencil case
Pens, lots of pens with different textures and colours
A hardcover book
My Kindle
Bose QC 35 headphones
Swell water bottle
Second pair of glasses
A pair of sunglasses
We ended up not using most of the props I brought, but I was glad to have them with me just in case. I also brought a second outfit and some accessories like a scarf and jewellery.

7. Be at your very best
Of course, you want to look your best on the day of the photoshoot. Preparation can vary from one person to another, but to give you an idea, here are the different things I did to prepare.
Hair and makeup plan
I planned my makeup and hair ahead of time and tried a few options at home before going to the shoot.
Here is what I planned:
Nails: simple manicure with a simple light nude pink shade
Hair: washed on the morning of the shoot, then blowdried and lightly straightened
Makeup: light and natural, yet concealing my blemishes
I also took with me my hairbrush and bobby pins, my lipstick for on-site retouches, some chapstick and concealer.
What I did before the shoot
3 days before:
Do my nails
Pluck my eyebrows
Iron my clothes
Get to bed early
Drink a lot of water and no alcohol
Eat healthily
Pre-order the Uber to get me to the photoshoot location
The day before:
Moisturizing facemask
Clean all the accessories with a microfiber cloth (especially screens)
Prepare the bag with all I need for the photoshoot
8. The day of the shoot
R-E-L-A-X. If you are like me, the idea of having someone focused on you for a few hours is highly stressful. Being the centre of attention is not easy and I spent a lot of time in front of the mirror figuring out poses. I suggest checking out Sorelle Amore's videos of posing in photography. Have a chat with your photographer beforehand about your fears and insecurities. Be transparent with him/her about that elbow you think looks wierd or that little tummy everone finds cute but you hate in photos. You might also find you have a favourite profile and that your hands are such an asset for your portraits!
If your photographer is anything like mine, he/she will start by taking a few random shots to get the lighting right and to get you comfortable in your new model career. Have fun with the poses and situations, keep in mind a checklist of the shots you want, and ask for feedback. It really gets on my nerves when people say "Just be yourself", but in that case, it's true. Work on your laptop, tell an anecdote, have a laugh, take a sip of coffee and write something in your notebook, grab a book, look outside, and enjoy life!
I would also suggest having a quick hair and makeup check-up once in a while as moving around can mess things up.
My photoshoot lasted 2 hours and I was exhausted at the end. Turns out being self-conscious is quite demanding in terms of energy levels!
9. After the shoot
A few days after the shoot you should get your first edits from your photographer. We had settled with my photographer that he would send me a few different versions of the edits for 5-10 photos so I could tell him which kind of edit I preferred. I also made a selection of the shots I preferred - there were over 300 pictures taken! He then edited the shots I had selected and I paid him.
The editing process can vary depending on the photographer. I suggest discussing the terms of the editing process with him/her beforehand to avoid too much back and forth.
10. Share your pictures to the world!
Now you have tens of beautiful pictures of yourself, it's time to share them! Update your profile pictures on social media, update your website, and post in the comments on how the process went for you!
